Creating a Clone of Unity's Console Window
In our last post we created a Unity window and added two resizable panels. In this post, we will improve upon it and make it a clone of Unity’s console window. This post is going to be a little bit longer, so I will omit the previously written code, but the final version will still be available in full at the end.
Before we start coding, let’s examine the console window and see what we should add.
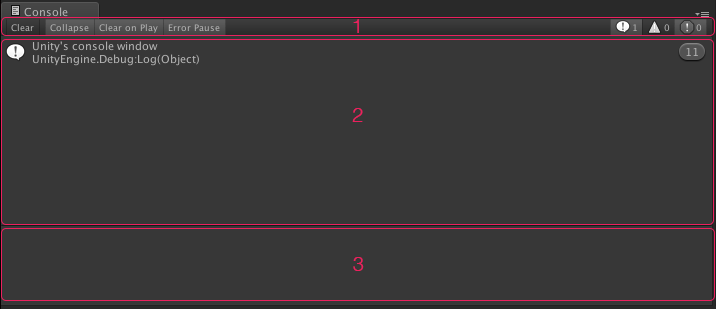
The window starts with a menu bar (1) which has one button and six toggles. The button and three toggles are aligned to left, and the remaining toggles are aligned to right. The button clears the window, while toggles turn on and off specific options. Then there is a scroll view (2) that contains clickable boxes with icons and text. Boxes change color when you click on them, and their content is displayed in the bottom panel (3), a text area which is not editable but selectable.
Alright then, we can start. But, before we do, I would like to fix a tiny issue from the previous post’s code. I left a magic number as the height of the resizer area, and I would like to convert it to a proper variable:
    private Rect upperPanel;
    private Rect lowerPanel;
    private Rect resizer;

    private float sizeRatio = 0.5f;
    private bool isResizing;

    private float resizerHeight = 5f;

    private GUIStyle resizerStyle;
And, further down the code, once again replace the magic number with the variable:
    private void DrawLowerPanel()
    {
        lowerPanel = new Rect(0, (position.height * sizeRatio) + resizerHeight, position.width, (position.height * (1 - sizeRatio)) - resizerHeight);

        GUILayout.BeginArea(lowerPanel);
        GUILayout.Label("Lower Panel");
        GUILayout.EndArea();
    }

    private void DrawResizer()
    {
        resizer = new Rect(0, (position.height * sizeRatio) - resizerHeight, position.width, resizerHeight * 2);

        GUILayout.BeginArea(new Rect(resizer.position + (Vector2.up * resizerHeight), new Vector2(position.width, 2)), resizerStyle);
        GUILayout.EndArea();

        EditorGUIUtility.AddCursorRect(resizer, MouseCursor.ResizeVertical);
    }
Menu Bar
Now we can start adding our menu bar. We will draw this bar just as we drew other panels: by feeding GUILayout.BeginArea() a rectangle which would define its position and size (basically, its area). I am going to steal this area from the upper panel, so that we won’t have to change other panels’ positions or heights. You can make this bar as tall as you would like, but since we are cloning Unity’s console window, we should stick to default and make it 20 pixels in height. Also, please note that this time, GUILayout.BeginArea() takes a second parameter: EditorStyles.toolbar. As the name suggests, this parameter tells Unity to draw this area in toolbar style. EditorStyles has many other options to choose from which affects how the GUI elements are displayed, so I would suggest checking them out and see Unity team used them in their own editor windows.
    private Rect upperPanel;
    private Rect lowerPanel;
    private Rect resizer;
    private Rect menuBar;

    private float sizeRatio = 0.5f;
    private bool isResizing;

    private float resizerHeight = 5f;
    private float menuBarHeight = 20f;

    private GUIStyle resizerStyle;
private void OnGUI()
{
DrawMenuBar();
DrawUpperPanel();
DrawLowerPanel();
DrawResizer();
ProcessEvents(Event.current);
if (GUI.changed) Repaint();
}
private void DrawMenuBar()
{
menuBar = new Rect(0, 0, position.width, menuBarHeight);
GUILayout.BeginArea(menuBar, EditorStyles.toolbar);
GUILayout.EndArea();
}
private void DrawUpperPanel()
{
upperPanel = new Rect(0, menuBarHeight, position.width, (position.height * sizeRatio) - menuBarHeight);
GUILayout.BeginArea(upperPanel);
GUILayout.Label("Upper Panel");
GUILayout.EndArea();
}OK, we are ready to add our buttons and toggles. I could have added them in the code above, but there are a couple of new concepts that I should explain beforehand. First of all, there is GUILayout.BeginHorizontal(). You see, GUILayout, as the name suggests, lays out the GUI automatically vertically. However, a toolbar is laid out horizontally, so we need to use GUILayout.BeginHorizontal() and then use GUILayout.EndHorizontal() so that Unity stops horizontal layout and continues automatic vertical layout. Then, there is GUILayout.FlexibleSpace() which acts like a spring and pushes other UI elements to the edges of its container by filling the space between them. On the other hand, GUILayout.Space(int) creates just the amount of space you need. GUILayout.Button() returns true when it is clicked and GUILayout.Toggle() returns a boolean depending on the status of the toggle: true when it is on and false when it is off.
    private float resizerHeight = 5f;
    private float menuBarHeight = 20f;

    private bool collapse = false;
    private bool clearOnPlay = false;
    private bool errorPause = false;
    private bool showLog = false;
    private bool showWarnings = false;
    private bool showErrors = false;

    private GUIStyle resizerStyle;
private void DrawMenuBar()
{
menuBar = new Rect(0, 0, position.width, menuBarHeight);
GUILayout.BeginArea(menuBar, EditorStyles.toolbar);
GUILayout.BeginHorizontal();
GUILayout.Button(new GUIContent("Clear"), EditorStyles.toolbarButton, GUILayout.Width(35));
GUILayout.Space(5);
collapse = GUILayout.Toggle(collapse, new GUIContent("Collapse"), EditorStyles.toolbarButton, GUILayout.Width(50));
clearOnPlay = GUILayout.Toggle(clearOnPlay, new GUIContent("Clear On Play"), EditorStyles.toolbarButton, GUILayout.Width(70));
errorPause = GUILayout.Toggle(errorPause, new GUIContent("Error Pause"), EditorStyles.toolbarButton, GUILayout.Width(60));
GUILayout.FlexibleSpace();
showLog = GUILayout.Toggle(showLog, new GUIContent("L"), EditorStyles.toolbarButton, GUILayout.Width(30));
showWarnings = GUILayout.Toggle(showWarnings, new GUIContent("W"), EditorStyles.toolbarButton, GUILayout.Width(30));
showErrors = GUILayout.Toggle(showErrors, new GUIContent("E"), EditorStyles.toolbarButton, GUILayout.Width(30));
GUILayout.EndHorizontal();
GUILayout.EndArea();
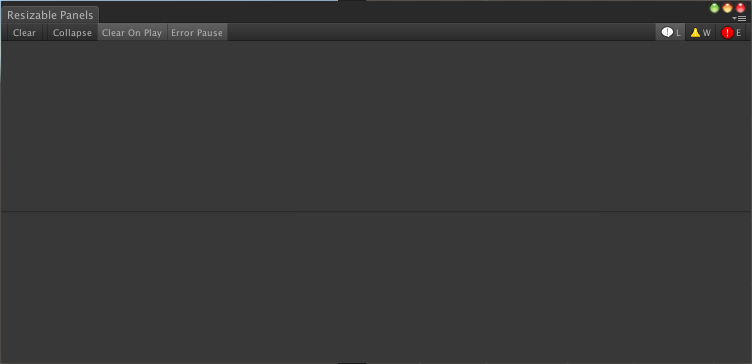
}It looks pretty good, but the toggles on the right are missing their icons. Adding icons and textures to GUI elements is rather easy, but Unity lacks the documentation on how to do it. Here’s a piece of information you probably can’t find on the internet: Unity uses EditorGUIUtility.Load(string) to load editor resources and this piece of script lists some of the default Unity editor textures (all the icons). I checked the list and found the icons used in the console editor, so let’s add them into our own clone.
    private GUIStyle resizerStyle;

    private Texture2D errorIcon;
    private Texture2D errorIconSmall;
    private Texture2D warningIcon;
    private Texture2D warningIconSmall;
    private Texture2D infoIcon;
    private Texture2D infoIconSmall;
private void OnEnable()
{
errorIcon = EditorGUIUtility.Load("icons/console.erroricon.png") as Texture2D;
warningIcon = EditorGUIUtility.Load("icons/console.warnicon.png") as Texture2D;
infoIcon = EditorGUIUtility.Load("icons/console.infoicon.png") as Texture2D;
errorIconSmall = EditorGUIUtility.Load("icons/console.erroricon.sml.png") as Texture2D;
warningIconSmall = EditorGUIUtility.Load("icons/console.warnicon.sml.png") as Texture2D;
infoIconSmall = EditorGUIUtility.Load("icons/console.infoicon.sml.png") as Texture2D;
resizerStyle = new GUIStyle();
resizerStyle.normal.background = EditorGUIUtility.Load("icons/d_AvatarBlendBackground.png") as Texture2D;
} private void DrawMenuBar()
{
menuBar = new Rect(0, 0, position.width, menuBarHeight);
GUILayout.BeginArea(menuBar, EditorStyles.toolbar);
GUILayout.BeginHorizontal();
GUILayout.Button(new GUIContent("Clear"), EditorStyles.toolbarButton, GUILayout.Width(35));
GUILayout.Space(5);
collapse = GUILayout.Toggle(collapse, new GUIContent("Collapse"), EditorStyles.toolbarButton, GUILayout.Width(50));
clearOnPlay = GUILayout.Toggle(clearOnPlay, new GUIContent("Clear On Play"), EditorStyles.toolbarButton, GUILayout.Width(70));
errorPause = GUILayout.Toggle(errorPause, new GUIContent("Error Pause"), EditorStyles.toolbarButton, GUILayout.Width(60));
GUILayout.FlexibleSpace();
showLog = GUILayout.Toggle(showLog, new GUIContent("L", infoIconSmall), EditorStyles.toolbarButton, GUILayout.Width(30));
showWarnings = GUILayout.Toggle(showWarnings, new GUIContent("W", warningIconSmall), EditorStyles.toolbarButton, GUILayout.Width(30));
showErrors = GUILayout.Toggle(showErrors, new GUIContent("E", errorIconSmall), EditorStyles.toolbarButton, GUILayout.Width(30));
GUILayout.EndHorizontal();
GUILayout.EndArea();
}It definitely looks like a clone of the console window, right? :)
Upper Panel
Let’s move on to the upper panel. This panel should be scrollable, because it could contain more content than it can display. Here is another new concept: GUILayout.BeginScrollView(Vector2 scroll) creates a scroll view in the area it is defined. All the GUI elements between GUILayout.BeginScrollView(Vector2 scroll) and GUILayout.EndScrollView() will be displayed in this scroll area.
    private Vector2 upperPanelScroll;

    private GUIStyle resizerStyle;

    private Texture2D errorIcon;
    private Texture2D errorIconSmall;
    private Texture2D warningIcon;
    private Texture2D warningIconSmall;
    private Texture2D infoIcon;
    private Texture2D infoIconSmall;
private void DrawUpperPanel()
{
upperPanel = new Rect(0, menuBarHeight, position.width, (position.height * sizeRatio) - menuBarHeight);
GUILayout.BeginArea(upperPanel);
upperPanelScroll = GUILayout.BeginScrollView(upperPanelScroll);
GUILayout.EndScrollView();
GUILayout.EndArea();
}Unity’s console window displays boxes in this panel, so will we. However, it is not going to be one liner, because we need to know what kind of content needs to be displayed (info, warning or error), and what its index number is (so that we can do a zebra effect on the boxes). For these reasons, it is going to be a little more work than we did previously. First of all, we need an enum for the content type of the box, which fortunately exists: LogType. Then, we should create a method for drawing boxes. This method will draw a box, add an icon to the left of the content based on its type, set the background color to a lighter or darker color based on its index (lighter if the index is odd, darker if the index is even) and then display a text.
    private Vector2 upperPanelScroll;

    private GUIStyle resizerStyle;
    private GUIStyle boxStyle;

    private Texture2D boxBgOdd;
    private Texture2D boxBgEven;
    private Texture2D boxBgSelected;
    private Texture2D icon;
    private Texture2D errorIcon;
    private Texture2D errorIconSmall;
    private Texture2D warningIcon;
    private Texture2D warningIconSmall;
    private Texture2D infoIcon;
    private Texture2D infoIconSmall;
private void OnEnable()
{
errorIcon = EditorGUIUtility.Load("icons/console.erroricon.png") as Texture2D;
warningIcon = EditorGUIUtility.Load("icons/console.warnicon.png") as Texture2D;
infoIcon = EditorGUIUtility.Load("icons/console.infoicon.png") as Texture2D;
errorIconSmall = EditorGUIUtility.Load("icons/console.erroricon.sml.png") as Texture2D;
warningIconSmall = EditorGUIUtility.Load("icons/console.warnicon.sml.png") as Texture2D;
infoIconSmall = EditorGUIUtility.Load("icons/console.infoicon.sml.png") as Texture2D;
resizerStyle = new GUIStyle();
resizerStyle.normal.background = EditorGUIUtility.Load("icons/d_AvatarBlendBackground.png") as Texture2D;
boxStyle = new GUIStyle();
boxStyle.normal.textColor = new Color(0.7f, 0.7f, 0.7f);
boxBgOdd = EditorGUIUtility.Load("builtin skins/darkskin/images/cn entrybackodd.png") as Texture2D;
boxBgEven = EditorGUIUtility.Load("builtin skins/darkskin/images/cnentrybackeven.png") as Texture2D;
boxBgSelected = EditorGUIUtility.Load("builtin skins/darkskin/images/menuitemhover.png") as Texture2D;
} private void DrawResizer()
{
resizer = new Rect(0, (position.height * sizeRatio) - resizerHeight, position.width, resizerHeight * 2);
GUILayout.BeginArea(new Rect(resizer.position + (Vector2.up * resizerHeight), new Vector2(position.width, 2)), resizerStyle);
GUILayout.EndArea();
EditorGUIUtility.AddCursorRect(resizer, MouseCursor.ResizeVertical);
}
private bool DrawBox(string content, BoxType boxType, bool isOdd, bool isSelected)
{
if (isSelected)
{
boxStyle.normal.background = boxBgSelected;
}
else
{
if (isOdd)
{
boxStyle.normal.background = boxBgOdd;
}
else
{
boxStyle.normal.background = boxBgEven;
}
}
switch (boxType)
{
case LogType.Error: icon = errorIcon; break;
case LogType.Exception: icon = errorIcon; break;
case LogType.Assert: icon = errorIcon; break;
case LogType.Warning: icon = warningIcon; break;
case LogType.Log: icon = infoIcon; break;
}
return GUILayout.Button(new GUIContent(content, icon), boxStyle, GUILayout.ExpandWidth(true), GUILayout.Height(30));
}
private void ProcessEvents(Event e)
{
...Now we can use DrawBox() method in DrawUpperPanel() to actually display some content:
    private void DrawUpperPanel()
    {
        upperPanel = new Rect(0, menuBarHeight, position.width, (position.height * sizeRatio) - menuBarHeight);

        GUILayout.BeginArea(upperPanel);
        upperPanelScroll = GUILayout.BeginScrollView(upperPanelScroll);

        DrawBox("Hello, World!", LogType.Log, true);
        DrawBox("ResizablePanels here!", LogType.Log, false);
        DrawBox("How do I look?", LogType.Warning, true);
        DrawBox("The lower panel doesn't seem to be working.", LogType.Error, false);
        DrawBox("You should start working on that.", LogType.Warning, true);

        GUILayout.EndScrollView();
        GUILayout.EndArea();
    }
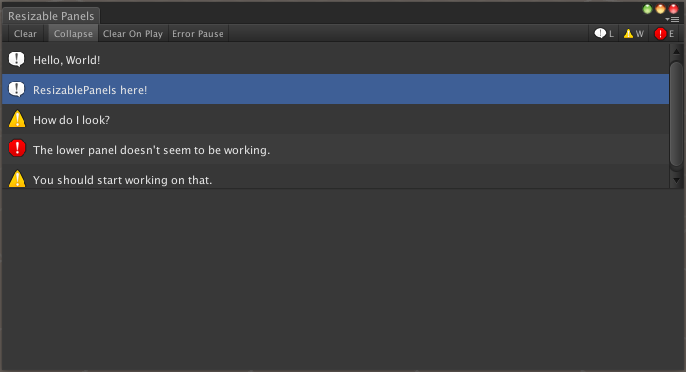
And the result is a scrollable panel with a zebra effect and icons!:
Lower Panel
Up next is the lower panel. All this panel does is to display a message, so we will just add a scroll view and a text area.
    private Vector2 upperPanelScroll;
    private Vector2 lowerPanelScroll;

    private GUIStyle resizerStyle;
    private GUIStyle boxStyle;
    private GUIStyle textAreaStyle;
private void OnEnable()
{
errorIcon = EditorGUIUtility.Load("icons/console.erroricon.png") as Texture2D;
warningIcon = EditorGUIUtility.Load("icons/console.warnicon.png") as Texture2D;
infoIcon = EditorGUIUtility.Load("icons/console.infoicon.png") as Texture2D;
errorIconSmall = EditorGUIUtility.Load("icons/console.erroricon.sml.png") as Texture2D;
warningIconSmall = EditorGUIUtility.Load("icons/console.warnicon.sml.png") as Texture2D;
infoIconSmall = EditorGUIUtility.Load("icons/console.infoicon.sml.png") as Texture2D;
resizerStyle = new GUIStyle();
resizerStyle.normal.background = EditorGUIUtility.Load("icons/d_AvatarBlendBackground.png") as Texture2D;
boxStyle = new GUIStyle();
boxStyle.normal.textColor = new Color(0.7f, 0.7f, 0.7f);
boxBgOdd = EditorGUIUtility.Load("builtin skins/darkskin/images/cn entrybackodd.png") as Texture2D;
boxBgEven = EditorGUIUtility.Load("builtin skins/darkskin/images/cnentrybackeven.png") as Texture2D;
boxBgSelected = EditorGUIUtility.Load("builtin skins/darkskin/images/menuitemhover.png") as Texture2D;
textAreaStyle = new GUIStyle();
textAreaStyle.normal.textColor = new Color(0.9f, 0.9f, 0.9f);
textAreaStyle.normal.background = EditorGUIUtility.Load("builtin skins/darkskin/images/projectbrowsericonareabg.png") as Texture2D;
} private void DrawLowerPanel()
{
lowerPanel = new Rect(0, (position.height * sizeRatio) + resizerHeight, position.width, (position.height * (1 - sizeRatio)) - resizerHeight);
GUILayout.BeginArea(lowerPanel);
lowerPanelScroll = GUILayout.BeginScrollView(lowerPanelScroll);
GUILayout.TextArea("It is working now!", textAreaStyle);
GUILayout.EndScrollView();
GUILayout.EndArea();
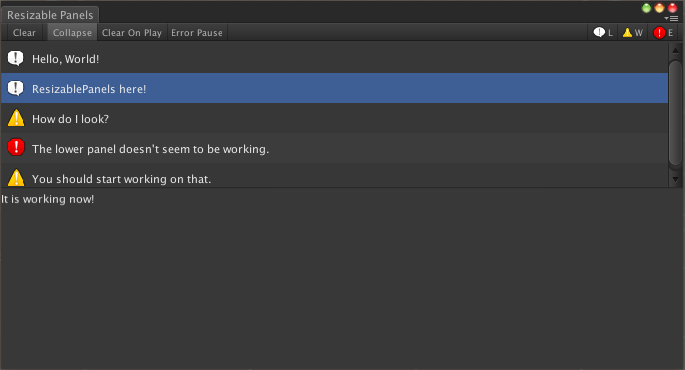
}It looks great!
Adding Interaction
Yes, our window looks good, but it doesn’t do anything useful right now. Since this is a console window clone, I would like it to receive log messages from Unity’s own Debug class and display them in a similar manner. A log contains some data, such as a log string, a stack trace and a type, hence we need a class for it. We will be keeping the instances of this class in a list and a reference to the selected log. When we modify the upper and lower panel code, our window will start behaving exactly like the console window.
public class Log
{
    public bool isSelected;
    public string info;
    public string message;
    public LogType type;

    public Log(bool isSelected, string info, string message, LogType type)
    {
        this.isSelected = isSelected;
        this.info = info;
        this.message = message;
        this.type = type;
    }
}
using UnityEngine;
using UnityEditor;
using System.Collections.Generic; private List<Log> logs;
private Log selectedLog; private void OnEnable()
{
errorIcon = EditorGUIUtility.Load("icons/console.erroricon.png") as Texture2D;
warningIcon = EditorGUIUtility.Load("icons/console.warnicon.png") as Texture2D;
infoIcon = EditorGUIUtility.Load("icons/console.infoicon.png") as Texture2D;
errorIconSmall = EditorGUIUtility.Load("icons/console.erroricon.sml.png") as Texture2D;
warningIconSmall = EditorGUIUtility.Load("icons/console.warnicon.sml.png") as Texture2D;
infoIconSmall = EditorGUIUtility.Load("icons/console.infoicon.sml.png") as Texture2D;
resizerStyle = new GUIStyle();
resizerStyle.normal.background = EditorGUIUtility.Load("icons/d_AvatarBlendBackground.png") as Texture2D;
boxStyle = new GUIStyle();
boxStyle.normal.textColor = new Color(0.9f, 0.9f, 0.9f);
boxBgOdd = EditorGUIUtility.Load("builtin skins/darkskin/images/cn entrybackodd.png") as Texture2D;
boxBgEven = EditorGUIUtility.Load("builtin skins/darkskin/images/cnentrybackeven.png") as Texture2D;
boxBgSelected = EditorGUIUtility.Load("builtin skins/darkskin/images/menuitemhover.png") as Texture2D;
textAreaStyle = new GUIStyle();
textAreaStyle.normal.textColor = new Color(0.9f, 0.9f, 0.9f);
textAreaStyle.normal.background = EditorGUIUtility.Load("builtin skins/darkskin/images/projectbrowsericonareabg.png") as Texture2D;
logs = new List<Log>();
selectedLog = null;
} private void DrawUpperPanel()
{
upperPanel = new Rect(0, menuBarHeight, position.width, (position.height * sizeRatio) - menuBarHeight);
GUILayout.BeginArea(upperPanel);
upperPanelScroll = GUILayout.BeginScrollView(upperPanelScroll);
for (int i = 0; i < logs.Count; i++)
{
if (DrawBox(logs[i].info, logs[i].type, i % 2 == 0, logs[i].isSelected))
{
if (selectedLog != null)
{
selectedLog.isSelected = false;
}
logs[i].isSelected = true;
selectedLog = logs[i];
GUI.changed = true;
}
}
GUILayout.EndScrollView();
GUILayout.EndArea();
}
private void DrawLowerPanel()
{
lowerPanel = new Rect(0, (position.height * sizeRatio) + resizerHeight, position.width, (position.height * (1 - sizeRatio)) - resizerHeight);
GUILayout.BeginArea(lowerPanel);
lowerPanelScroll = GUILayout.BeginScrollView(lowerPanelScroll);
if (selectedLog != null)
{
GUILayout.TextArea(selectedLog.message, textAreaStyle);
}
GUILayout.EndScrollView();
GUILayout.EndArea();
}In order to receive logs from Debug.Log() calls, we need to tap into Unity’s log message event. Generally, we can’t access parts of Unity API that are restricted to main thread but, fortunately, Unity exposes an application event called logMessageReceived. We are going to subscribe to this event in OnEnable() and in the subscriber method we will create a Log object and add it the list of logs.
    private void OnEnable()
    {
        errorIcon = EditorGUIUtility.Load("icons/console.erroricon.png") as Texture2D;
        warningIcon = EditorGUIUtility.Load("icons/console.warnicon.png") as Texture2D;
        infoIcon = EditorGUIUtility.Load("icons/console.infoicon.png") as Texture2D;

        errorIconSmall = EditorGUIUtility.Load("icons/console.erroricon.sml.png") as Texture2D;
        warningIconSmall = EditorGUIUtility.Load("icons/console.warnicon.sml.png") as Texture2D;
        infoIconSmall = EditorGUIUtility.Load("icons/console.infoicon.sml.png") as Texture2D;

        resizerStyle = new GUIStyle();
        resizerStyle.normal.background = EditorGUIUtility.Load("icons/d_AvatarBlendBackground.png") as Texture2D;

        boxStyle = new GUIStyle();
        boxStyle.normal.textColor = new Color(0.9f, 0.9f, 0.9f);

        boxBgOdd = EditorGUIUtility.Load("builtin skins/darkskin/images/cn entrybackodd.png") as Texture2D;
        boxBgEven = EditorGUIUtility.Load("builtin skins/darkskin/images/cnentrybackeven.png") as Texture2D;
        boxBgSelected = EditorGUIUtility.Load("builtin skins/darkskin/images/menuitemhover.png") as Texture2D;

        textAreaStyle = new GUIStyle();
        textAreaStyle.normal.textColor = new Color(0.9f, 0.9f, 0.9f);
        textAreaStyle.normal.background = EditorGUIUtility.Load("builtin skins/darkskin/images/projectbrowsericonareabg.png") as Texture2D;

        logs = new List<Log>();
        selectedLog = null;

        Application.logMessageReceived += LogMessageReceived;
    }

    private void OnDisable()
    {
        Application.logMessageReceived -= LogMessageReceived;
    }

    private void OnDestroy()
    {
        Application.logMessageReceived -= LogMessageReceived;
    }
private void LogMessageReceived(string condition, string stackTrace, LogType type)
{
Log l = new Log(false, condition, stackTrace, type);
logs.Add(l);
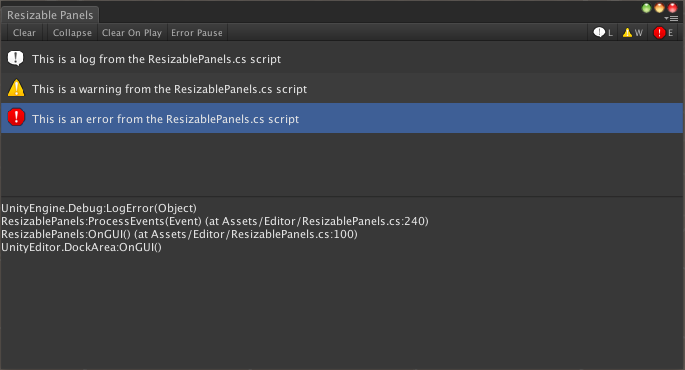
}Time for the ultimate test: take your ResizablePanels.cs code to a working application of yours or just create a new Monobehaviour in your current project. Throw in a couple of Debug.Log(), Debug.LogWarning() and Debug.LogError() calls and see how your window works.
Conclusion
This concludes our tutorial on creating a clone of the console window. Now we have a window that looks almost exactly like a console, and has similar functionality (implementing the rest of the functionality can be an exercise for the reader :) ). Let’s review what we learned in this post:
- Styling GUI elements as a menu bar.
- Laying out GUI elements both vertically and horizontally.
- Creating buttons and toggles.
- Adding texture to GUI elements.
- Creating scroll views.
- Subscribing to Unity’s Debug events.
It doesn’t seem like a lot, but believe me, we have covered everything you need to know in order to build your own editor windows. In the next blog post, we will have a look at node-based editors and start creating them for ourselves. And as I promised, here is the script in full. Until next time.